
Traditional Pierogi Dough (Vegan Friendly, No Eggs) Recipe
If you’ve ever enjoyed the comforting taste of homemade pierogi but wished for a simple, vegan-friendly dough to match, you’re in for a treat. This Traditional Pierogi Dough (Vegan Friendly, No Eggs) recipe is an absolute game changer, combining just a few humble ingredients to create a soft, elastic dough that’s perfect for cradling your favorite fillings. Whether you’re new to pierogi or a seasoned pro looking for a plant-based twist, this recipe will inspire you to get rolling and savor every bite.
Ingredients You’ll Need
Believe it or not, making the perfect dough doesn’t require a fancy pantry. The ingredients here are wonderfully basic, but each plays a vital role in creating a dough that stretches just right, cooks up tenderly, and has that classic pierogi texture you love.
- 4 cups (500 g) all-purpose flour: The backbone of your dough, providing structure and chew.
- 1 cup (8.45 fl oz, 250 ml) hot water: Helps bring the dough together and partially “cooks” the flour for softness.
- 1 tsp salt: Enhances the flavor, making every bite sing.
How to Make Traditional Pierogi Dough (Vegan Friendly, No Eggs)
Step 1: Prepare the Flour and Water
Start by sifting the flour onto a clean work surface, then create a well in the center. Pour in a small amount of hot water, and begin mixing with your hands. This initial step is all about slowly bringing the flour and water together, aiming for an even, moistened mix without overwhelming the flour too quickly.
Step 2: Gradually Incorporate More Water
Keep adding the hot water a little at a time, blending it in thoroughly as you go. The dough will begin to form as the flour absorbs the moisture. Pay close attention to its feel—allow it to “drink” as much water as it needs so your dough won’t be dry or crumbly later.
Step 3: Achieve the Perfect Dough Texture
When the dough no longer sticks to your hands, you’ve hit the right hydration. Knead everything together until the dough is smooth, soft, and elastic. Don’t rush this part—it may take some time, but patience here pays off with tender pierogi wrappers.
Step 4: Use a Mixer for Efficiency
If you prefer, swap the manual kneading for a mixer with a dough hook. Place the flour in your bowl, start the mixer, and gradually add hot water—up to half a cup. Check the texture as you knead for about 5 minutes, adjusting flour or water in small amounts if needed to balance softness and pliability.
Step 5: Rest the Dough
Once kneaded, cover the dough and let it rest at room temperature for 15 to 30 minutes. This resting period allows the gluten to develop, making the dough easier to roll out and less likely to tear. You can cover it with a clean cloth or invert a warm bowl over it to keep it cozy.
Step 6: Roll and Cut
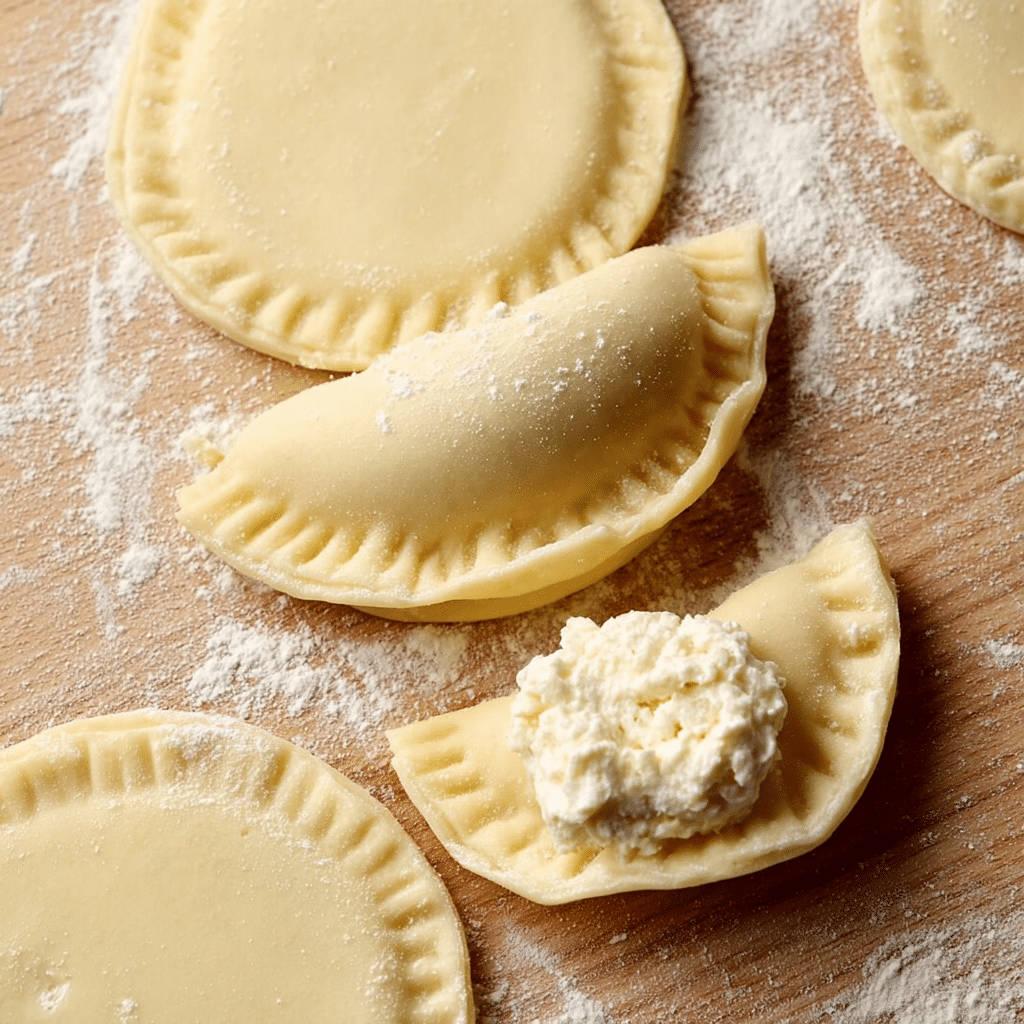
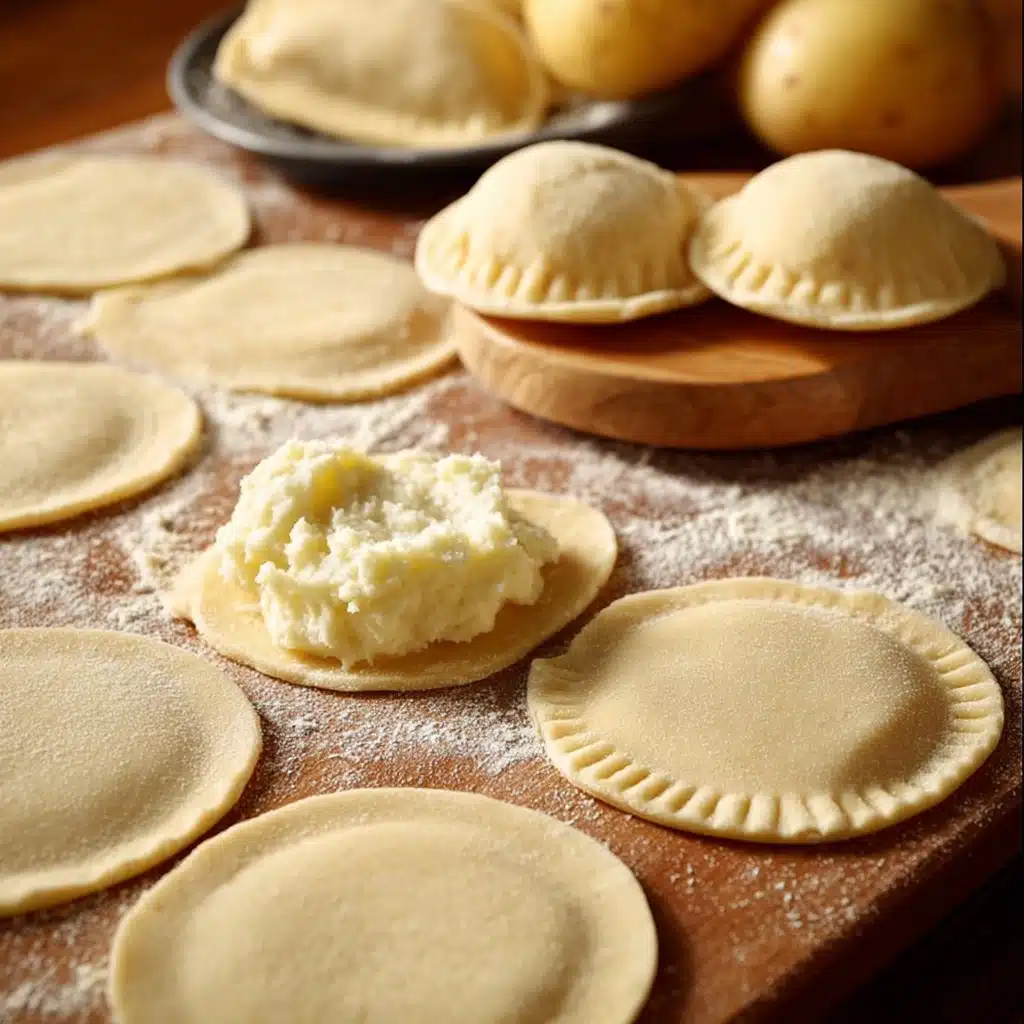
After resting, divide your dough into manageable chunks. Dust your work surface generously with flour and roll one chunk as thin as you can—aiming for delicate wrappers that still hold together. Cut circles of around 3 inches (7.5–8 cm) in diameter using a cookie cutter or the rim of a glass. These will be your pierogi shells.
Step 7: Fill and Shape
Place about a tablespoon of your preferred filling in the center of each dough circle. Fold the dough over, creating a classic semi-circular shape, and press the edges firmly to seal. This step is all about creating a tight seal to prevent your delicious filling from leaking during cooking.
Step 8: Cook Your Pierogi
Bring a large pot of water to a boil, then drop in a few pierogi at a time. Wait for them to float to the surface—that’s your signal to cook them for just one more minute for the perfect, tender finish. Remove them with a slotted spoon promptly to avoid overcooking.
Step 9: Serve and Enjoy
Serve immediately with a drizzle of melted butter or your favorite vegan topping. For an extra touch of golden crispiness, fry boiled pierogi in a pan with some butter or oil until both sides are beautifully browned. Yum!
How to Serve Traditional Pierogi Dough (Vegan Friendly, No Eggs)
Garnishes
Traditional pierogi shine with simple garnishes that add bursts of flavor and texture. Think sautéed onions, dollops of vegan sour cream, chives, or a sprinkle of freshly cracked black pepper. These little touches elevate the dish without overpowering the delicate dough and filling balance.
Side Dishes
Pair your pierogi with refreshing sides like a crisp cucumber salad or roasted veggies to add color and crunch. A bowl of warm borscht or a simple mixed green salad can also complement this dish beautifully, turning it into a satisfying, well-rounded meal.
Creative Ways to Present
For a fun twist, serve pierogi as bite-sized appetizers topped with unique sauces like mushroom gravy or a tangy tomato chutney. You can also arrange them on a platter with colorful garnishes for a festive gathering or family meal, making your vegan pierogi the star of the show.
Make Ahead and Storage
Storing Leftovers
If you have leftover pierogi dough or cooked pierogi, wrap them tightly in plastic wrap or place in an airtight container and refrigerate. Properly stored, the fresh dough will last up to 2 days, while cooked pierogi should be eaten within 3 days for the best texture.
Freezing
Both uncooked pierogi and dough freeze beautifully. For uncooked pierogi, freeze them individually on a baking sheet before transferring to a freezer bag to prevent sticking. Dough can be shaped into a ball, wrapped, and frozen for up to 3 months. Thaw dough overnight in the fridge before rolling.
Reheating
To reheat cooked pierogi, gently pan-fry them in a little oil until warm and crispy or simmer briefly in boiling water. Avoid microwave reheating if possible, as it can make the dough chewy instead of tender.
FAQs
Can I use whole wheat flour instead of all-purpose flour?
Absolutely! You can substitute whole wheat flour for part or all of the all-purpose flour, but expect a denser dough with a nuttier flavor. You might need to adjust water quantities slightly as whole wheat absorbs more liquid.
Why do I use hot water instead of cold?
Hot water partially gelatinizes the starches in the flour, which gives the dough a silky texture and makes it more pliable. It’s especially helpful in this vegan recipe since it lacks eggs to bind.
Can I make this dough without any kneading?
While minimal kneading approaches exist, traditional pierogi dough benefits significantly from proper kneading to develop gluten, ensuring elasticity and strength. Skipping kneading risks dough that tears easily during assembly.
Is it possible to freeze pierogi after cooking?
Yes! While freezing cooked pierogi is possible, they tend to stick together or become slightly soggy upon reheating. Freezing raw pierogi before cooking maintains their texture much better.
How thin should I roll the dough?
Roll it as thin as you can without making it fragile—ideally around 1/8 inch thick. Thin dough ensures the pierogi cook quickly, overpowers the filling less, and delivers that classic tender bite.
Final Thoughts
This Traditional Pierogi Dough (Vegan Friendly, No Eggs) recipe is your passport to creating comforting, delightful pierogi that everyone will enjoy—regardless of their diet. Its simplicity, versatility, and perfect texture make it a staple you’ll return to again and again. So why wait? Get your hands floury, embrace the joy of homemade pierogi, and share the warmth of this treasured dish with your loved ones.
Print
Traditional Pierogi Dough (Vegan Friendly, No Eggs) Recipe
- Total Time: 40 minutes
- Yield: Approximately 24 pierogi 1x
- Diet: Vegan
Description
This traditional pierogi dough recipe is vegan-friendly and requires no eggs, making it a perfect base for a variety of pierogi fillings. The dough is soft, elastic, and easy to work with, providing the perfect texture for these delicious Eastern European dumplings. Whether boiled or pan-fried, pierogi made from this dough are sure to be a crowd-pleaser.
Ingredients
Dough Ingredients
- 4 cups (500 g) all purpose flour
- 1 cup (8.45 fl oz, 250 ml) hot water
- 1 tsp salt
Instructions
- Sift and Mix Initial Flour: Sift four cups of flour onto your work surface. Make a well in the center and pour in a small amount of hot water. Start mixing using your hands to moisten the flour evenly.
- Add Water Gradually: Gradually add more hot water and continue blending it in with the flour to form a dough.
- Hydrate the Dough: Allow the dough to absorb the water until it doesn’t stick to your hands anymore, indicating it has enough liquid.
- Knead Thoroughly: Knead the dough continuously until it becomes soft, elastic, and free of lumps. This may take some time, so be patient.
- Use Mixer (Optional): Attach a dough hook to a mixer, place the flour in the bowl, and with the machine running, slowly add up to half a cup of hot water.
- Adjust Dough Texture: After mixing, poke the dough with your fingers. If it’s too loose, add flour by the tablespoon; if too tough, add water teaspoon by teaspoon.
- Final Mixing: Run the mixer for 5 minutes to ensure a soft, elastic dough that doesn’t stick to your hands.
- Rest the Dough: Cover the dough ball with a cloth or an inverted warmed bowl and let it rest at room temperature for 15 to 30 minutes to develop gluten.
- Divide Dough: Once rested, divide the dough into workable chunks, typically quartering it.
- Roll Out Dough: Dust the work surface with flour, roll out a chunk of dough as thinly as possible.
- Cut Circles: Use a 3-inch (7.5-8 cm) round cookie cutter or glass rim to cut out dough circles.
- Fill and Shape Pierogi: Place a tablespoon of your chosen filling in the center of each dough circle. Fold the dough over to make a semi-circular dumpling and press edges firmly to seal.
- Cook Pierogi: Boil a large pot of water and cook pierogi in batches. Once they float to the surface, cook for an additional minute and remove with a slotted spoon.
- Serve: Serve immediately topped with melted butter, or pan-fry the boiled pierogi in butter until golden on both sides for extra flavor.
Notes
- Make sure the water is hot to help soften the dough and make it easier to knead.
- Adjust flour or water quantities slightly as needed depending on humidity and flour type.
- Resting the dough is important for gluten development, resulting in a better texture.
- You can freeze uncooked pierogi for later use; just separate them with parchment paper.
- For vegan dishes, use plant-based butter or oil for frying or serving.
- Fillings can range from savory to sweet, including potatoes, cheese, mushrooms, or fruit.
- Prep Time: 15 minutes
- Cook Time: 10 minutes
- Category: Dumplings
- Method: Mixing, Kneading, Boiling, Optional Pan-frying
- Cuisine: Eastern European
Nutrition
- Serving Size: 2 pierogi (approx. 60g)
- Calories: 150
- Sugar: 0.3g
- Sodium: 200mg
- Fat: 0.5g
- Saturated Fat: 0.1g
- Unsaturated Fat: 0.3g
- Trans Fat: 0g
- Carbohydrates: 33g
- Fiber: 1g
- Protein: 5g
- Cholesterol: 0mg
Keywords: pierogi dough, vegan pierogi, dumpling dough, traditional pierogi, no egg dough
